
Stage One – Preparation (covered in Part 1)
Stage Two – Walk-through of the Parser Script (covered in Part 2 and Part 3)
Stage Three – Creating of the Parser Schema (covered in Part 4)
Stage Four – Unit test and submission (covered in Part 5)
The guys who know me will be aware that I have been heavily focused on TTP previously. My view writing Genie Parsers was going to be a step too far at the time. I thought it was too difficult and it was down to avoiding REGEX but over time I have mellowed. Now I am happy that both have a place in my tool set. Don’t stress too much around REGEX it looks complicated but in reality you can borrow the same ones from the existing parsers. Alternatively, look at the standard ones in TTP as they cover quite a few scenarios (I make reference to the REGEXs used in a previous tutorial on TTP).
The format of the code snippets may not be great for copy/pasting. For that reason, please find a copy of the finished parser on my Github for reference purposes.
https://github.com/gwoodwa1/Blog-Files/blob/master/show_nbar.py
Right, let’s start off by explaining the stages required to create a new parser.
Stage One – Preparation
The process is documented by Cisco and there is a link here to the original documentation for your reference in case you want to refer back.
https://pubhub.devnetcloud.com/media/pyats-development-guide/docs/contribute/contribute.html
The first set of actions may seem trivial but it’s kind of important to have everything setup correctly before we get to the interesting part of looking at the parsers themselves.
We need to create a new virtual environment on our machine because we’re going to be using a completely separate instance of pyATS. You do not want to be trashing your existing installation. Think of it as a development/sdk virtual environment which does not interfere with your main one. The process below is fairly standard in terms of creating virtual environments.
mkdir sdk
cd sdk
python3 -m venv .
source bin/activate
The next step requires a GitHub account so please sign up for one if you haven’t already. What we need to do is “fork” the genieparser repo into to your own Github area. Forking is taking a copy of an existing live repository/directory of files and it’s what you are going to be working with when you submit your parser eventually.
You need to visit :
https://github.com/CiscoTestAutomation/genieparser
Make sure you are signed into Github and find the fork option on the top right and click it.
You don’t need to do anything yet with that just yet but you will need this when you submit.
The next step is to clone the genieparser repo into your virtual environment on your local machine
git clone https://github.com/CiscoTestAutomation/genieparser.gitWe then need to carry out some custom steps to activate the environment. Change directory into the genieparser directory. Observe the MakeFile which resides in there and open it up in a text editor if you wish to see what’s about. This will be used to finish off the setup.
cd genieparserAlso while we’re at it there is a mention in the docs of uninstalling various repos using the command below. Note: I did not need to do this because I used a completely new virtual environment.
pip uninstall genie.libs.conf genie.libs.ops genie.libs.sdk genie.libs.robot -yOkay so now we need to execute the following below which runs a series of custom installations to make the environment ready. This is being referenced by the makefile. On a side topic, if makefiles are new to you then I suggest reading about them as they are really cool for simplifying complex installation steps and running BASH commands/python scripts.
make developIf that all goes well without error then you should be good to start. In my case I had issues and the modifications/installations used by make develop had errors. I had to do the following as advised by the super helpful team on the Cisco Webex forum:
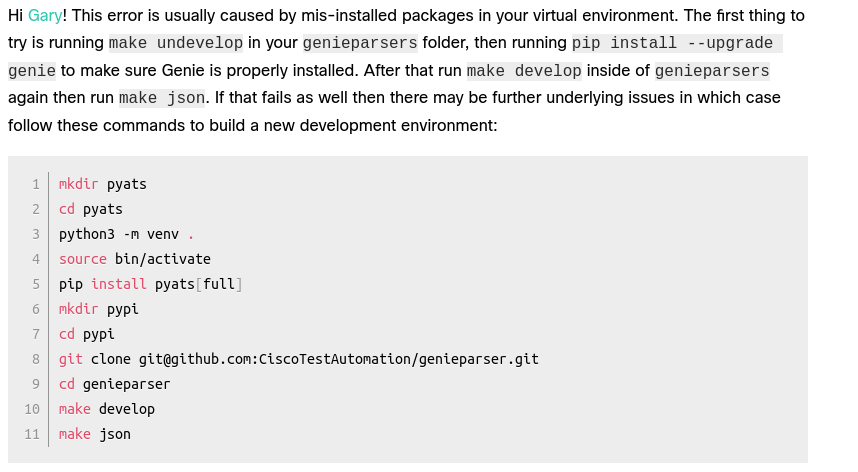
Note: I also had to follow the first steps and I did not need to build a new virtual environment which is described in that second part (Steps 1-11).
You will also see this mention of make json which is absolutely key to all of this as once you create your parser and then you want to see it works then just placing the file in the right folder is not enough. You need to activate it so that Genie/pyATS will see it and use it. This is where make json comes into it the picture. It’s worth running it now to see what comes back because when things are not right with the installation it will error. Nothing will really happen as we haven’t changed anything yet.
make jsonThis is what it comes back with when things are good (run from the genieparser directory):
(sdk) gary@gary-MS-7B17:~/sdk/genieparser$ make json

--------------------------------------------------------------------
Generating Parser json file

INFO:genie.json.make_json:Learning 'parser_genie_parser'

Done.
I think that completes the setup of the environment. You are now ready to move to Part 2 where I will talk about the authoring of the parsers themselves.

Thanks for step by step instructions on how to write Genie parsers. This will go a long way in educating people on how to contribute their code to the existing Genieparser repository on Github for everyone’s benefit.
LikeLike
hello, when will you write the creating genie parsers part 5?I have been waiting for a long time, they are valuable so much.
LikeLike
Hi, Apologies I neglected my blog for sometime now but I am happy to go further with this series. If there is demand and a list of topics which people would like me to cover off? Thank you for the kind feedback though and glad you found it valuable.
LikeLike